How to get your game on Tabletop Simulator now without flipping the table
If you’re moving your board game designs and playtesting online so that you can playtest your game with others remotely/virtually, as well as playtest some of their games, my #1 recommendation is Tabletop Simulator (TTS). It’s an application that runs on the gaming engine Steam.

You can play classic games like chess and checkers, which have already been made available in Tabletop Simulator, as well as other free games in their workshop and inexpensive downloadable games.
But the best part about TTS is being able to create your own games. You can use existing components available in the program or create your own that you’ve made yourself, and put together any game in a sandbox environment.
I’ve been using Tabletop Simulator a lot lately and found the learning curve is not nearly as big as I expected. Now I wish that I had started using it sooner (and much more frequently)!
Let’s briefly walk through the steps needed to get your game onto Tabletop Simulator.
Once you have your game ready, you’ll need playtesters. Download my handy guide to find playtesters (both in-person and online) now:
Install Steam and Tabletop Simulator
First, you’ll need to install Steam, which is absolutely free.
Next, purchase Tabletop Simulator. It normally runs for $19.99, but you can sometimes find it on sale for up to 50% off. It’s a small one-time investment that could actually save you time and money once you’re more familiar with it.
Create your game, upload and test it out
Once you’ve installed Steam and Tabletop Simulator, you can put together your first game. You can always make use of any of the existing components within the program, such as dice of all types, decks of standard cards, and various tokens, cubes, and components. But you will also probably want to use your own cards, boards, and components in your game as well.
Step 1 – Prepare your Tabletop Simulator files
First, you’ll want to save any individual boards or components you want for your game as jpg files.
If you’re using cards, custom dice, or some other very customized components, you’ll need to work with a template.
There are 2 ways to set up your card templates. The first is opening the card template and pasting each individual card into the appropriate slots. The second, which is much faster, is to use the built-in deck builder functionality.
Let’s look at how to use the deck builder.
You can either search on your computer for the location of these templates using Windows Explorer or the equivalent on a Mac or locate them through Steam, going through the following steps:
- Select Library
- Right-click on Tabletop Simulator
- Click Properties
- Select Local Files
- Select Browse Local Files
- Go to Modding folder
- Go into the Deck Builder folder
- Open the Deck Builder program
- Select New Deck
- Set your deck size (10 x 7 is the default and I suggest leaving it as is)
- Drag and drop all your individual card images into the window
- Check to make sure everything looks good
- Save your file
- Export your file as a jpg or png file
Helpful tip: Save a shortcut to this folder. It will make it so much easier to locate!
For cards, you’ll save one file with your card fronts, in order, and another file with your card backs, in the same order. If it’s just one deck of cards with the same back, you can have this card back saved as a single jpg file. But if you have different backs, you’ll want to make sure that the fronts and backs are aligned, by using the same number for the front and back card files.
When you’re using standard-sized cards, you can fit 69 on one sheet (it’s actually 69 cards plus one that is left blank). If you’re using more than 69 cards, you’ll need another sheet with a corresponding sheet for the card backs.
I found it easier to create one file per deck. Let’s say you have an item deck that contains 10 cards. You also have an action deck that contains 30 cards. I’d recommend creating a file with 10 items displayed in slots 1 through 10 as the item deck fronts. Then, use a single jpg file with the card backs. Do the same with the action deck for the 30 cards needed and one file for the card backs. You’ll upload these separately. You save a lot of time by not needing to split the deck once it is uploaded.
If you’re creating custom dice or any other custom components, replace the appropriate spots in the template using your assets.
Step 2 – Upload your assets to Dropbox or the Internet
For Tabletop Simulator to recognize your images, they must first be uploaded to the Internet or be available through Dropbox, as TTS requires you to supply the URL for their location.
Dropbox is the easiest method and you can get a free account with limited space. But there are other alternatives as well.
If you have a website, you can upload these here. If you use WordPress, select “media” from your left-hand menu and upload any files. Once uploaded, you can click on them to get the URL.
If you don’t have a website, you can upload your images to Imgur or use an alternate program. Just make sure to set your images as public.
Step 3 – Set up your game on Tabletop Simulator
Now that you have all your assets ready, it’s time to create your game!
Fire up Tabletop Simulator and click “create”, then “single player”. Close the menu box that opens and you’ll start with an empty table.
From the top menu, click “objects”, then “table”, and choose the table you’d like to use.
Now add anything else you need, such as a board, dice, etc. one at a time by going back into “objects”, and selecting “components”, then choosing the item of your choice. Select any generic items that are available that you want. Now we’ll import the custom items you created.
If you have a board created, go into the “board” menu and choose “custom”. Paste the URL for your board here and import this.
Similarly, import custom cards by going to “cards”, then “custom”. Here, you’ll need to paste the URL for the card fronts and the URL for the card backs. If your deck has one unique back, leave “unique backs” unchecked, but if there is more than one different back, make sure to check this box. Also indicate the number of cards in your deck. Keep the width at 10 and height at 7 if you are using the standard template, otherwise, adjust the number of rows and columns here accordingly. Only check “sideways” if your cards are meant to be used sideways. Import the cards and repeat this process for any other decks you have.
Continue to add any custom or generic items you need, and you should be ready to go!
You only need to add one of each unique item. These can then be duplicated or altered. I will explain this process in just a moment.
Once you have your game ready, you’ll need playtesters. Download my handy guide to find playtesters (both in-person and online) now:
Get familiar with the functionality in Tabletop Simulator
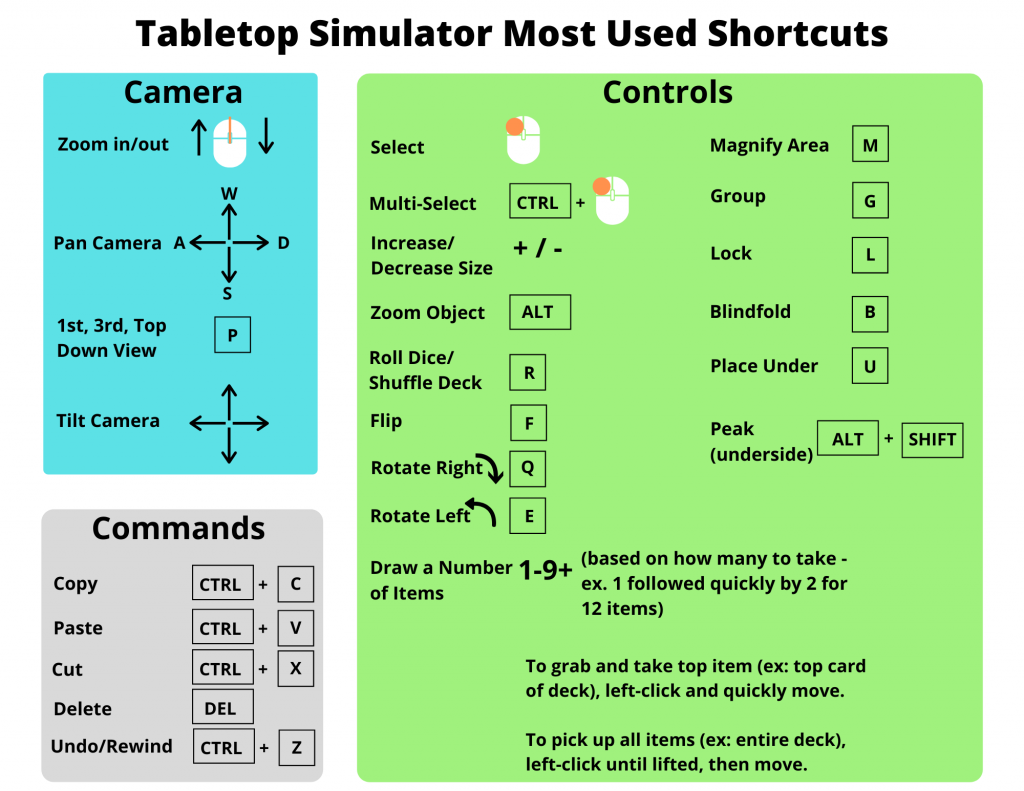
There are several commands you can use to move around in this environment and do different things. As you play around with Tabletop Simulator more, you’ll become familiar with these.
You can access most of these by right-clicking your mouse over an object and selecting the appropriate action, or by using shortcuts.
Here are some of the most useful commands you’ll want to learn:

Next steps
Next week, we’ll look into how to find players, playtest your game, and communicate with others on Tabletop Simulator.
Any questions about getting your game up and running on Tabletop Simulator? Click the comment button below and let me know!
Once you have your game ready, you’ll need playtesters. Download my handy guide to find playtesters (both in-person and online) now:

7 comments
Kevin
Thanks for these great tips! Is making a board on TTS similar to the cards i.e. there is a template for a custom image?
Joe Slack
Thanks for the question, Kevin!
Importing a game board is even easier than a deck of cards. No template is needed. You simply select the file to import. However, it creates a large raised border around it, so you can just as easily bring it in as a token, selecting the file for the top and the bottom of the board (it can be the same for both), and re-size it as needed.
Derek DeJager
I am far from an expert in computers. I understand the basics of what your saying but doubt I could pull it off on my own. Im not trying to design any new games. I just have a couple games that I own and want to play with my friends across the country that are not on TTS. Is there any way to find someone who is good at this stuff that is constantly making games for it or that would want to help create it as long as I explained the game and how it is played. As I said, im terrible with technology in general and think I would get frustrated and give up before making any real progress. So im willing to help however I can, but Im hoping to find someone who can make these or takes suggestions as to what else is missing that would be good to add. There are some hidden gems that no one knows about that need to be added. But those who know about them like me arent able to get them onto TTS. Need to find some middle ground to get that done. Any help or suggestions would be appriciated
Joe Slack
Hi Derek. I hear you. TTS and technology are not for everyone.
If you’re looking for someone to port your game over to TTS, I highly recommend Tim Metcalf at https://www.gleeforge.com/. He helped me by adding some scripting to one of my games and identifying and fixing a bug in another. He’s quick, reasonably priced, and great to work with.
exonaut.art
Thanks so much for this, Joe, this is tremendously helpful! I have experimented with setting up games on Tabletopia before, but never on TTS. My reason for Tabletopia was that I can share and playtest my games for free with people who don’t want to pay for an account. I understand TTS requires every playtester to have paid for an account, is that right? So I was wondering why so many board game designers use TTS over Tabletopia? Is it much better/easier?
Joe Slack
My pleasure, Exonaut!
I think there are a few main reasons that most designers favour TTS.
(1) Low-cost one-time fee (vs a monthly fee)
(2) It is more powerful (scripting and more functionality)
(3) More designers use this, so it is easy to find other designers for playtesting (quite a bit in part to #1 and #2, which creates a cycle)
Tabletop Simulator Alternatives
[…] Tabletop Simulator (TTS) is probably the most popular sandbox for creating and playing tabletop games online. However, it’s far from perfect. So, if you’re looking for Tabletop Simulator alternatives, there are other options available to you. […]